
|
Navigation: Purchasing (Main Module) > Purchase Orders PO Work Area |
Scroll Prev Top Next More |
PURCHASING > Purchase Orders > PO Work Area

Your PO Work Area is where you can work on unprocessed Purchase Orders.
POs will remain in your work area until they are processed. Until then, you can add, modify, and delete POs without affecting other areas of the system. Your work area contains your "work in progress".
For general information on the use of Work Areas in SpendMap, see Document Work Areas.
In addition to entering new orders directly into your PO Work Area (i.e. from scratch), POs can be built automatically from other sources, including: •Approved Requisitions. •Awarded RFQs. •Inventory items that have fallen below their re-order level, via the Staging Batch. •Item requirements imported from another system, via the Staging Batch. •A PO already in your PO Work Area. •An already processed PO. •A PO Template. |
 Need to modify a processed PO?
If you need to work on a PO that you've already processed, you can process a Change Order or you can cancel the PO and reload it back into your PO Work Area. |
Related settings, utilities and information
•Before you start processing Purchase Orders, please review Getting Started with Purchase Orders. •Settings that affect your PO Work Area can be found in PO Entry Settings and User Defined Field Settings. •Various utilities related to your PO Work Area can be found in the Purchase Orders section of the Main Menu, including utilities to create PO templates, transfer POs to other users, reserve PO numbers, etc. |
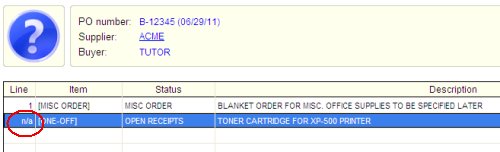
This screen lists one line for each page in your PO Work Area.
You can add new POs using the various buttons at the bottom of the screen or POs may have already been built for you automatically from other sources. See Other ways to create POs, above, for more details.
TIP: If you know the supplier that you want to order from, use [Add] to create a new PO and go to the PO Header Screen where you can select a supplier for the order. If you know the item that you want to purchase but don't know which supplier to use, try the [Item] button instead. For more details, see the Help for the respective buttons, below.
The Status Column indicates the status of each PO. Only POs with a status of "OK" can be processed.
What do “VALIDATE” and “NEW” mean in the Status Column?
"VALIDATE" indicates that the PO was created/built from another source rather than being keyed directly into your PO Work Area and did not pass validation (i.e. is missing mandatory information or otherwise failed to pass a business rule). To validate a PO, modify the PO and click [OK] on the Purchase Order Header Screen... you will be pointed to the field(s) in question. In some cases, individual line items may also require validation. “NEW” indicates that the PO was created/built from another source and you have not assigned a PO number yet. You can either manually assign PO numbers to new POs on the Purchase Order Header Screen or PO numbers can be assigned automatically. For details on auto-assigning PO numbers when POs are built from other sources, see the Auto Document Creation field in the [SETTINGS] folder of the User Master File. |
Page Column indicates the number of forced page breaks in the PO, not the number of pages that will be included when the PO is printed. A PO in the list may show only one “page” but may take up more than one printed page if, for example, there are too many line items to fit on a single printed page. You may want to force a page break when creating a PO with multiple Ship-to addresses (i.e. a separate page for each Ship-to) or simply to make reading the PO easier (e.g. special instructions on a separate page, etc.). To force a page break, use the [PAGE BREAK] button. |
 Buttons
Button |
Description |
|
[DONE] |
•Exit your Work Area and return to the Main Menu. You will get a pop-up option to process your new POs or you can leave them in your Work Area to be processed later. |
|
[ADD] |
•Add a new PO and go to a blank Purchase Order Header Screen. This would typically be used if you know the supplier that you want to order from (the supplier and related information must be completed on the PO Header Screen before selecting items for the order). TIP: To start by selecting an item to purchase (e.g. if you don't know the supplier of the item), try the [Item] button instead. |
|
[MODIFY] |
•Modify the selected PO. Alternatively, double-click on the line. This takes you to the Purchase Order Header Screen. |
|
[DELETE] |
•Delete the selected PO or PO page.
|
|
[COPY] |
•Create a new PO by copying the selected/highlighted PO on this screen, a processed PO, an archived PO or a PO Template. Once the PO is copied, it can be modified as required prior to processing. |
|
[PAGE BREAK] |
•Force a page break (i.e. add a new page to the selected PO). For details, see About the Page Column above. |
|
[HOLD] |
•Prevent the selected PO from being processed. |
|
[SPLIT CHARGE] |
•Modify the shared (i.e. "multi-line") split charge details for all applicable line items on the selected PO page. |
|
[ITEM] |
•Create a new PO, starting with an Item Code. You will be prompted to select one of the suppliers defined for the item, or you can select a different supplier if you like. •Use this if you know the item that you want to order, but not who supplies it. •Once you select the item and supplier, you will be brought to the Line Items Details Screen where you can complete the remaining item details (e.g. quantity, account coding, etc.). •If there is already a PO in your Work Area for the selected supplier, the item will be added to that existing PO, otherwise a new PO will be created for you. |
|
[PREVIEW] |
•Preview the selected PO in its printed format. |
Any or all of the fields on the PO Header may appear on your PO form.
The "header" fields at the top of this screen apply to all line items listed at the bottom of the screen. However, some fields (e.g. Ship-To) can be different for each page of the PO. To create a new page, use the [PAGE BREAK] button on the PO Work Area Summary Screen.
You must complete the Supplier and Purchase Order Number fields before adding items to the PO.
To view the address details of a supplier, bill-to or ship-to code, click on the applicable field. The “address” hyperlink next to the fields will change from black to blue text to indicate which address is being displayed.
In some cases, you may not be able to access certain fields, such as when modifying processed POs or when working on multiple-page POs.
What does “VALIDATE” in the Description Column mean?
"VALIDATE" indicates that the PO was created/built from another source rather than being keyed directly into your PO Work Area and the line item did not pass validation (i.e. is missing mandatory information or otherwise failed to pass a business rule). To validate a line item, modify the line and click [OK] on the Line Item Details Screen...you will be pointed to the field(s) in question. |
Special notes for Change Orders
•When modifying a processed PO in your PO Work Area, PO line items are color-coded as follows: Grey = Unchanged existing PO line •The system is sensitive to line number sequencing for existing (already processed) lines on the PO. Therefore, there are some restrictions when it comes to moving, deleting or inserting new lines in between existing items on Change Orders. Inserting Lines: You cannot insert PO lines in front of existing PO lines on a page. You can add new lines to the bottom of the list of existing lines or they can be inserted before new lines that were added to the PO during this modification session. Moving Lines: If a Description-Only line is moved (i.e. using the [CUT/COPY] button), the line will remain "<MOVED>" with a blank description (lines with blank description will not affect the printed PO). Standard lines can only be copied; they cannot be moved. Deleting Lines: Deleted lines will remain on the PO as "<CANCELED>" with a zero quantity and will remain on the printed PO as canceled in order to retain the existing line numbering prior to the Change Order. |
POs can include up to 99 line items on each “data entry page”. When printing/processing POs, SpendMap will automatically paginate based on the amount of space available on your printed PO form. That is, a “data entry” page may contain more line items that can fit on a “printed” page if, for example, you include lengthy descriptions for items. To add a new data entry page to the PO, use the [PAGE BREAK] button on the PO Work Area Summary Screen. |
Field |
Description |
||||
PO Number Set and Purchase Order Number |
•Select a PO Number Set and/or enter a PO number, if applicable. •Based on the configuration of the PO Number Set that you select, the next available PO number in that Set may be assigned to the PO or you may be able to manually type the PO number. •The PO Number Set field defaults for you and may be locked/restricted based on the settings in your user profile. •Also, for POs that are built from other sources (e.g. approved Requisitions, awarded RFQs, etc.), the PO number may already be assigned so that the order is ready to process, again, based on the settings in your user profile. |
||||
Date |
•The PO Date defaults to the current date but can be changed if needed. |
||||
•Choose how you would like to send this PO to the supplier. This will determine how the PO is sent/transmitted when it is processed. The field will default based on the selected supplier but can be changed as required. REGULAR/MAIL – Prints a hard copy when the PO is processed. FAX DIRECT - The PO will be faxed automatically when processed. You will have the option to also print a hard copy of the PO when processing. E-MAIL - The PO will be sent via e-mail when processed. You will have the option to also print a hard copy of the PO when processing. NONE/VERBAL - The PO will not be printed or transmitted when processed. Use this option when you only want to store the PO in the system but have another means of informing the supplier about the new order (e.g. by phone). XML – Pushes the order directly into the supplier’s online order entry system using the PunchOut Module. You will have the option to also print a hard copy of the PO when processing See also Electronic Documents. TIP: If you want to send the supplier a confirmation of a verbal order, don't use "NONE/VERBAL". Rather, use one of the other options and select the "Confirmation Only" check box (see below), so that "Confirmation Only" (or equivalent) prints on the PO. |
|||||
Supplier |
•Enter a supplier code or enter <*> (an asterisk) to use a one-off supplier. •Use the “address” hyperlink to update the supplier’s address manually. More...
|
||||
Bill-To |
•Enter a bill-to code or enter <*> (an asterisk) to use a one-off bill-to. •Use the “address” hyperlink to update the bill-to address manually. More...
|
||||
Ship-to |
•Enter a ship-to code or enter <*> (an asterisk) to use a one-off ship-to. •Use the “address” hyperlink to update the ship-to address manually. More...
|
||||
Terms of Payment |
•The Terms of Payment describe the conditions of payment for the order and typically specify the period allowed for you to pay the amount due. The Terms of Payment are also used to calculate payment dates and early payment discounts when approving invoices with the Invoice Approval Module. •The field will default based on the selected supplier but can be changed as required. |
||||
FOB |
•The FOB point defines who is responsible for payment of shipping costs and where the title of the goods passes to you. •The field will default based on the selected supplier but can be changed as required. |
||||
Delivery Note |
•Defines how shipments from the supplier are to be delivered. For example, "Pick-Up", "Federal Express Overnight", or "your truck". •The field will default based on the selected supplier but can be changed as required.
|
||||
Comment #1 and #2 |
•Comment #1: Enter a Comment for the PO, which may appear on the PO form and can be used to filter many PO related reports. The field will default based on the selected supplier but can be changed as required. •Comment #2: Enter a second comment, if required, for the PO form only.
|
||||
Confirmation Only? |
•If checked (
|
||||
Auto-Receive? |
•If you are using the Receiving Module, check this box to have this PO automatically received by the system on its delivery date (thereby eliminating the need to enter Receipts for the PO).
|
 ), "
), "Button |
Description |
|
[OK] |
•Save changes to the PO. |
|
[CANCEL] |
•Exit without saving your changes. Depending on the changes that you have made to individual line items, this option may not be available (i.e. you may have to save the changes). |
|
[ADD] |
•Add a new line item to the bottom of the list. This will take you to a blank Purchase Order Line Item Details Screen. •You must complete the Supplier and Purchase Order Number fields before adding items to the PO. |
|
[MODIFY] |
•Modify the selected line item. Alternatively, double-click on the line. This will take you to the Purchase Order Line Item Details Screen. |
|
[DELETE] |
•Delete the selected line item. |
|
[INSERT] |
•Insert a new line above the currently selected line item. |
|
[COPY/CUT] |
•Copy or cut the selected line item.
|
|
[PREVIEW] |
•Preview a PO in your printed format. |
|
[BUDGETS] |
•Displays a summary of the budgets for all applicable account codes on the PO, including charges for the current PO (“Doc. Value”). •You can also click the green, yellow or red hyperlink at the top of the screen (the color of the link indicates that the document/transaction is within, over or approaching the budget limit). •This will include the value of ALL line items on the PO. To see the affect that an individual line item will have on the budgets, use the [Budgets] button on the Line Item Details Screen instead. |
|
[PUNCHOUT] |
•PunchOut (connect) to the supplier's website to select items for the PO. •If you have not yet selected a supplier for the PO, a list of PunchOut-enabled suppliers will be displayed for you to select from. |
Purchase Order Line Item Details Screen
Any or all of the PO Details may appear on your PO form.
All of the fields on this screen can be different for each line item on the PO. For example, each item can have a different delivery date, account coding, internal notes and attachments, etc.
If you are using the Inventory Control Module, a single PO can include both stock and non-stock items.
In addition to field-specific defaults (outlined for each field below), you can optionally default many fields for new line items based on the previous line item entered, which can reduce data entry when entering multiple items for the same purpose. See PO Entry Settings for details. |
When you save new line items, you may be warned that the item is already on order, depending on the settings in PO Entry Settings. This can help eliminate duplicate/unnecessary spending. Since you may not have access to items that are on order for other cost centers or inventory locations, (i.e. you may not want to be warned about those open orders), you can customize this warning in PO Entry Settings. |
Additional freight and per-order charges
When you save new line items, if freight or cost-per-order charges have been defined for the item, you will have the option of including these additional charges as separate line items on the PO. If a freight charge was defined for the item but the dollar amount or percentage was not specified, a line will be added to the PO with a zero value and the description "FREIGHT CHARGE (PENDING)". The amount can be entered later by modifying the PO or when approving the Invoice with the Invoice Approval Module. |
Field |
Description |
|||
Type |
•POs can include a combination of line item types: REGULAR ORDER – An item from the Item Master File or a one-off item, with a specific quantity and price. DESCRIPTION ONLY - Use this to add comments or instructions that appear on the PO, such as shipping instructions for the supplier, etc. To enter internal notes that will not appear on the PO, use the [NOTES] button instead. BLANKET ORDER - Creates a Blanket Order Line. This will bring you to the Blanket Order Details Screen where you can enter the Blanket Order limits/restrictions. RETURN OF GOODS/RMA - Creates a Return of Goods line, which can be used when returning items to a supplier for a refund or exchange. |
|||
•Check this box to create an included charge. Included charge line items must be added immediately following the parent line item on the PO. •An included charge is a line item whose value is included in the value of the parent item throughout the system for inventory valuation, charging to Cost Center history and budgets, etc. For example, you might create an included charge for things like freight, setup charges, etc.
|
||||
Asset Item? |
•Check this box to indicate that this is an Asset Item (if you are using the Asset Management Module). When Asset Items are received, their details are added automatically to the Asset Master File, thereby eliminating the need to add the item to the Asset Master File as a separate step.
|
|||
Item Code |
•Enter or select an item code or enter <*> (an asterisk) to use a one-off item. •If you enter the same item code twice, you receive a pop-up prompt to confirm that this is a new purchase of the item or an included charge for the previous item. •TIP: You can view the details of an item before actually selecting it, using the [VIEW] button while on the item Lookup list. |
|||
Quantity/Unit |
•Enter the quantity of the item required and the unit of measure.
|
|||
Price/Unit |
•Enter a price for ONE unit of the item and the unit of measure for the price. The price defaults to the selected supplier's price for the item but can be changed as required.
|
|||
Discount |
•If you enter a list price discount for this line, the price (entered above) will be discounted throughout the system. The field defaults to the selected supplier's discount for the item but can be changed as required.
|
|||
Taxes |
•Tax codes are used to calculate taxes for the line item based on the tax rate (percentage) entered in the Tax and Exchange Rates Master File.
|
|||
G/L Account |
•Enter an individual G/L Account for this line item or use the [SPLIT] button to charge this line to more than one G/L. •G/L Account Codes are used to categorize and track your spending. While the title of this field can be renamed, the term “G/L Account” generally defines the type of item being purchased. For example, most organizations would have G/L Account codes for things like office supplies, computer supplies, services, etc.
|
|||
Cost Center |
•Enter an individual charge-to Cost Center for this line item or use the [SPLIT] button to charge this line to more than one Cost Center. •Cost Center Codes are used to categorize and track your spending. While the title of this Master File can be renamed, the term “Cost Center” generally refers to who or what will be using an item being purchased, that is, the “end-user” of the item. Aside from “Cost Center”, commonly used terminology includes Charge-To, Department, Business Unit, Project, Job, etc.
|
|||
Request-by |
•Enter a Request-By code for this line item, if applicable. •While the title of this Master File can be renamed, the Request-By field is typically used to record the individual that needs an item being purchased (i.e. the end-user of the item) when that person is not creating the order in the system him or herself. That is, Request-By codes are most commonly used when someone is ordering on behalf of someone else.
|
|||
Project and Job |
•The Project and Job fields can be used to complement the G/L Account and Cost Center fields to categorize and track your spending. You can track purchase history and otherwise sort, filter and search for information in the system by Project and Job.
|
|||
Requisition |
•If the PO was built from an approved Requisition, the Requisition Number Field defaults accordingly. The Requisition Number can be used to search for POs in various areas in the system.
|
|||
Delivery |
•In addition to appearing on the PO Document to inform the supplier when the item is needed, the Delivery Date is used to determine when items are late in various areas of the system (e.g. Late Purchase Orders Report, Supplier Performance Report) should the item not be received by this date. •The Delivery Time is entered using a 24-hour format and you will only have access to the field if it is set to print on your PO Form.
|
|||
•For Stock Items that are kept in multiple stock Locations/Warehouses, you can enter a location to receive the item.
|
||||
•Up to 64,000 characters of text can be used to describe the item that will appear on the PO form, on many reports, and can be used to search for POs in the system. However, be sure to include all essential information in the first line of the description as the first line is used to reference the line item on some screens and reports where it is not practical to include the full/extended description. •Right-mouse-click to access spell check and cut and paste functions. •You can use the [BOILERPLATE] and [SUMMARY] buttons (details below) when the cursor is on the Description Field. •TIP: To enter internal notes that will NOT appear on the PO form that goes to the supplier, use the [NOTES] button.
|
Button |
Description |
|
[OK] |
•Save changes to the item and return to the PO Header Screen. |
|
[CANCEL] |
•Exit without saving your changes and return to the PO Header Screen. |
|
[SPLIT] |
•Split-charge the line item to more than one G/L Account or Cost Center. |
|
[BUDGETS] |
•Displays a summary of the budgets for all applicable account codes on the line item, including charges for the current item (“Doc. Value”). •This will include the value of ONLY this line item. To see the affect that the entire PO will have on the budgets, use the [Budgets] button on the PO Header Screen instead. |
|
[HISTORY] |
•View the Purchase or Usage History or the Cost Center History of the item. |
|
[NOTES] |
•Enter or modify the internal notes or file attachments for the line item. •Each item on the PO can have its own notes and attachments, which can be referenced when viewing the PO throughout the system (e.g. View PO Status). Unlike the Description of the item, the internal notes will NOT appear on the PO form that goes to the supplier. •If this PO was built from an approved Requisition or RFQ, the Internal Notes and File Attachments are brought forward. |
|
[BOILERPLATE] |
•Drop a Boilerplate (standard clause) into the description, when the cursor is on the Description Field. The Boilerplate text will be inserted at the current position of the cursor. |
|
[SUMMARY] |
•If you are using the Boilerplate Summary feature and have not yet included the Boilerplate Summary, you can add this to the document by selecting this button, when the cursor is on the Description Field.
|
Entering Blanket Order Lines
When you select BLANKET ORDER in the Type Field on the Purchase Order Line Item Details screen or on the Purchase Requisition Line Item Details Screen, the Blanket Order Detail Screen will be displayed for you to enter the restrictions (limits) that apply to a Blanket Order line item.
A Blanket PO represents an agreement between your company and a supplier to repeatedly source a quantity of goods or services from that supplier over a period of time. Like a regular PO, a Blanket Purchase Order commits you to buying a quantity or dollar value of one or more items. However, unlike regular POs that are typically received and paid for in their entirety, the items on a Blanket Order are usually received over time. For example, you may order a year’s worth of an item to get a volume discount and then receive the items over time, as you need them. The use of Blanket Orders avoids the administrative effort of processing frequent POs, while favoring discount pricing through volume commitments. You can then optionally send Releases to the supplier to inform them that you are ready to receive some of the items and otherwise enter Receipts and Invoices against the Blanket Order until the limits of the order are reached. Once the limit of a line item on the Blanket PO has been reached, you will no longer be able to enter Releases, Receipts or Invoices for the PO line. Many different items can appear on the same Blanket PO. Each line of the Blanket PO can be restricted (or capped-off) differently than other lines on the PO. For example, one item on the PO may be restricted to a specific dollar amount while another line may be restricted to a specific quantity. Options for restricting (capping) Blanket Order line items include: •A specific quantity of an item. •A specific value. •A specific date range. •Any combination of the above. |
Related reports and utilities?
Blanket Order Details Screen
This screen is used to enter the restrictions/limits of a Blanket PO line item. You can enter limits in one or more fields.
Once any of the limits of the line item have been reached, you will no longer be able to enter Releases, Receipts or Invoices against this PO line.
Field |
Description |
|
Standard or Miscellaneous blanket order? |
A Blanket Order line item can be created either for a specific item or for “miscellaneous” items. If you know the specific item for the order, select "Standard Blanket Order" and enter the item code in the field below. If, however, the Blanket Order is for a variety or category of items, select "Miscellaneous Blanket Order" to skip the Item Code Field. Later, when the items are released or received against the Miscellaneous Blanket Order line, you will have the opportunity to enter the details of the specific items that were purchased (e.g. item code, pricing, etc.). Example: You may want to create an order for $10,000 worth of office supplies but you won’t know the specific list of items that you will need until later, when you need them.
|
|
Item Code |
•Enter or select an item code or enter <*> (an asterisk) to use a one-off item. •If you enter the same item code twice, you receive a pop-up prompt to confirm that this is a new purchase of the item or an included charge for the previous item. |
|
Max Quantity and UOM |
•Enter the Maximum Quantity Limit and unit of measure for the line item to be released/received/invoiced or enter <1> for an unlimited quantity. •If you specify a quantity, the quantity appears as an “on-order balance” throughout the system. If you do not enter a quantity (i.e. if the Blanket PO line will be otherwise limited, such as by dollars or a date range), the on-order balance for the line will be considered to be zero for calculations throughout the system such as on the On-Hand/On-Order Report, Inventory Re-Order Report, etc., since there is actually an unlimited quantity on-order. |
|
Max Order Value |
•Enter the Maximum Order Dollar Value to be released/received/invoiced against this line or enter <0> for no limit. •In addition to restricting how much you can release/receive/invoice against this line, the value entered will also be used when calculating the open Purchase Order value and committed value for this line throughout the system, such as in the PO Status, Item Spend by Date Range Report, Supplier Spend by Date Range Report, etc.
|
|
Effective Date |
•Users will not be permitted to release against the order prior to this date. |
|
Expiry Date |
•Users will not be permitted to release against the order after this date. |
Entering Return of Goods (RMA) Lines
A Return of Goods (sometimes called Return Merchandise Authorization or "RMA") line item can be used when returning items to a supplier for a refund or exchange. SpendMap essentially treats an RMA as a "negative" Purchase transaction, that is, while a regular Purchase transaction will post positive values throughout the system, an RMA will post negative values throughout the system, as described below.
You can enter an RMA by selecting RETURN OF GOODS (RMA) in the Type Field on the Purchase Order Line Item Details screen.
The purpose of an RMA is to reverse the original Purchase transaction and all subsequent transactions for the original PO line (e.g., receipt, invoice, etc.) while leaving the original transactions intact for historical purposes. An alternative would be to cancel the original transactions altogether, using the applicable "cancel" utilities (i.e. cancel the invoice, cancel the receipt and/or cancel the original PO).
RMAs are most commonly used when the original PO has already been “closed” (received and invoiced). If the items have not yet been received or invoiced in the system, you may choose simply to send the item back to your supplier without entering the Receipt at all and/or make modifications to the original PO before receiving/invoicing (if so, consider adding an Internal Note for audit purposes). Your choice will depend on your own policies and what details of the transaction you choose to record in SpendMap.
An RMA line can either be entered with a new Purchase Order number or the line can be added to the original PO (the PO the item was originally purchased on).
When entering RMA lines, certain validation that occurs when entering regular PO lines will be ignored (bypassed), where applicable, such as Supplier Price Updates, Open Order Warnings, etc. When RMA lines are processed, they are automatically received and invoiced (closed) by the system. Therefore, there is no need to enter Receipts or Invoices for RMA lines. When you process an RMA line, the system will: •reduce the YTD dollars purchased from the supplier •reduce the quantity received •take the item out of inventory (for Stock Items) •post a Credit through the Invoice Approval Module •send a negative dollar amount (i.e. "credit") through the Invoice Interface •etc. (The actual negative values that are posted will depend on the type of item and the system’s Modules that you are using.) Also, RMA lines are not considered "processed" PO lines for performance statistics calculations. RMA lines must have a negative purchase quantity (since you are sending something back). If you enter a positive value in the Quantity Field, SpendMap will automatically convert to a negative quantity. |
Not getting a full refund? (e.g. restocking charge)
For maximum flexibility, you are NOT restricted by the pricing on the original PO. For example, when you create an RMA line, you can enter a unit price that is different from the original PO (e.g. if you are not getting a full refund or if there is a restocking charge). However, more flexibility means more room for error. Therefore, use caution and refer to the original PO’s pricing details when creating an RMA line. IMPORTANT: Since you can enter an RMA line at a different unit value than the original PO line, the value of the remaining items on the original PO may be affected. For example, if you originally bought 10 units at $100/EACH (total $1,000) but return one item at $90/EACH (due to a $10 restocking charge), the "value" of the remaining nine items on the original PO will be $910 ($1,000 minus the $90 return/refund) even though you paid only $900 for them. This will affect item unit valuation for the remaining items TIP: If you don't want the RMA to affect the remaining items as described above, you can process the RMA transaction at the original value ($100/EACH) and enter a new one-off (*) line item for the $10 restocking charge (a one-off charge does not affect the value of the items unless you make it an "included charge"). |
If you are using the Asset Management Module, you cannot create an RMA line for an Asset Item. You can create an RMA line to adjust the original PO line, but you must also delete the Asset Item from the Asset Master File as a separate step (or simply change the Asset’s status, for example, to “returned” rather than deleting it completely). |
