PURCHASING > My Team > User definable menus and pop-up prompts > Add/Remove individual menus and pop-up prompts
Once a user’s menu file has been created or copied from another user, you can use this utility to custom design the user’s menu to include only the menu options and pop-up prompts required by the user.
This is typically the last step when designing user-definable menus for users or groups of users.
NOTE: You can also do this using the applicable button in the [Modules] folder of the User Master File.
 Related Reports & Utilities
Questions & Options
1.Enter a User ID Code to update.
2.Select a module.
How to add/remove menus and prompts
Once you select a module, you will be presented with a list of menus in that module.
A check mark ( ) in the Include Column means that the user will have access to the menu when they log into the system.
A “+” to the left of a menu item indicates that a menu contains sub-menus. To see the sub-menus, click on the line.
Add or remove menus by clicking the box ( ) in the Include Column. If you include/exclude a menu that contains sub-menus, all menus underneath that menu will also be added or removed.
About Locking Pop-Up Prompts
When you lock (restrict) a pop-up prompt for a user using the [RESTRICT POP-UP PROMPTS] button, you will assign a default value for the pop-up that SpendMap will use whenever the prompt would normally be displayed. Therefore, the user will not see the option during normal use of the system (but it is still actually being selected automatically by the system).
To lock/default a pop-up prompt, you need to get to the pop-up itself in order to select the “lock” option and select a default value. When you select the [RESTRICT POP-UP PROMPTS], the applicable utility will be launched so that you can see all the screens and pop-up prompts. You can then navigate through the screens to add/remove pop-up prompts as needed.
WARNING: You are actually logged in as the user that you are setting access for while navigating through the system like this. Anything you do in the system will be saved as if the user was logged in and created the transaction. Therefore, either abort each operation before any data is saved or cancel any transactions that you process in this mode.
With the pop-up prompt displayed on the screen, select the “Lock-out this option” check box...
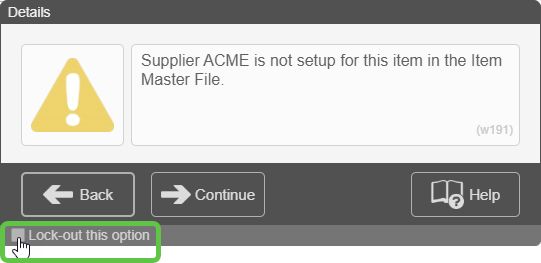
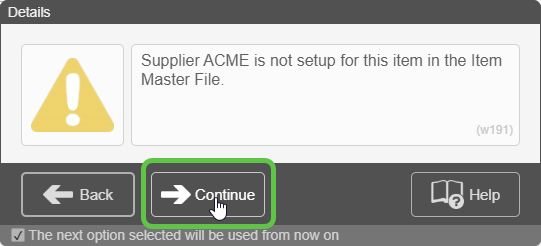
You will then notice that the text for the check box changes to “The next option selected will be used from now on”. At this point, you can select a default option for the prompt by clicking the applicable button...
Although the user will no longer see the pop-up prompt during normal use of the system, you will still see the prompt while using this utility in case you change your mind.
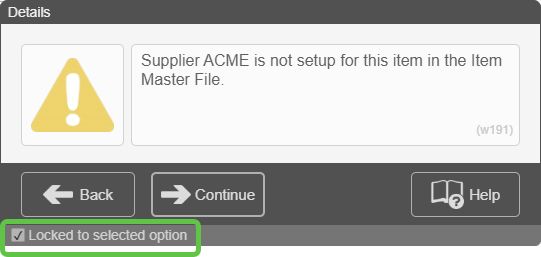
If you return to a prompt that has previously been locked, the check box text will show “Locked to selected option” and the defaulted option/button will be highlighted (see below). To turn the prompt back on for the user, just uncheck the box.
|


